Sunday, October 24, 2010

In Soviet Russia...

Cupcakes bake YOU!....

This may or may not be true. But in any case, I'm actually talking about Germany. Specifically, their contribution to the baking world in the form of chocolate. In cake. With chocolate. Am I confusing you? Alright, I'll just say it. German Chocolate Cake.

I have done cakes for the past few weeks because frankly, I like full cakes better than cupcakes. As cute as cupcakes are, there aren't many desserts much more elegant than a beautiful slice of layer cake. How-some-ever, I figured I would throw a bit of variety in here. And thus, I arrived at the conclusion I should bake German Chocolate Cupcakes. Thanks Martha, you're a doll.

I also figured they would be a little more handy for the party we were having at my Grandma's that night. My lovely Aunt Gail came down for a visit, and that enough is an excuse to have a bash. In pajamas. Watching a movie. With copious amounts of good food and diet pepsi. Oh dang.
Cupcakes and Chips and Pepsi, OH MY.

So off I went. As I began, I noticed the recipe required 5 oz of semisweet chocolate. Well lucky me, I had a little bit of Callebaut left in the.... *HORRIFIED GASP* MELISSA!! STOP EATING IT! Snatched it away, and found I had 6, count em, 6 oz. So I appeased her with the leftover oz and went on my merry way.


Presto Chango, Chocolate Batter!


I was a little concerned because the batter only called for 3/4 cup of butter. That doesn't seem like a lot to me... and it seemed like a lot less in the 10 cup Kitchenaid. Frick. Thankfully it made up for it in the filling. It was super rich thanks to BUTTER, egg yolks and brown sugar. Oh and some coconut and pecans. Roight roight.

Truthfully, there was a little skepticism when I noticed the lack of cream cheese in this filling. I considered saying screw it and making chocolate cream cheese and coconut pecan frosting..... but then I figured that they are probably delicious as they are, and I needed to learn to try the recipe before I decide it needs to be changed.

So I scoured for a big pot, and mixed the egg yolks, brown sugar and evaporated milk. As it was thickening, I realized I should probably start toasting my pecans. Threw those on the burner and then my timer for my cupcakes went off. I pulled those out, stabbed em to test done-ness, only to realize my brown sugar milk filling was boiling. So, with a pan of cupcakes in one hand I found a whisk and attempted to save it before it burned. As soon as I managed to get it under control I was reminded of my pecans toasting. Having had a bad experience with overly toasty nuts, I didn't have time to put down my cupcakes before I started rotating those. Then it basically turned into this limbo with me, the cupcakes, the filling, and the nuts. I'm a good multitasker and was doing fine until the doorbell rang. Stress overload.

I'm really not sure WHAT is wrong with my muffin tins. Maybe all of my baking pans are old and the Teflon is coming off. Whatever it is... I grease and flour the CRAP out of them. And it never seems to help very much. It's not my fault. Hrmph.

Martha's recipe used Cake and Pastry Flour in lieu of all purpose. Randomly, I had some on hand (yes, I'm just that intense. I also conveniently had the aforementioned evaporated milk... which I needed for the filling. WHAMMY.) I usually am not a fan of Cake Flour. It's pretty much the same, except it is ground finer and is therefore supposed to make lighter, fluffier cakes. I find that it DOES make them lighter, but the extra air pockety-ness makes them awfully prone to breaking and/or crushing. All purpose still gives you a wonderful texture, but it gives the cake a little more backbone and holds its shape better. In this sense, the cake flour is better for single layer cakes or cupcakes. I stick to all purpose for layering.

Toasty toasty nuts.

Also. For those wishing to break free of the cake mix... There is a simple formula for pretty much EVERY cake. And it goes a little something like this:
1. Cream butter and sugar until WHITE and fluffy.
2. Add eggs, one at a time, mixing until incorporated.
3. Whisk dry ingredients, and add them in 3 additions, alternating with your liquid (eg, milk or buttermilk)

Another important thing to note is not to overbeat your batter. While it may look the same right now... overbeating tends to make your cakes form steep peaks in the center when baked.


It's an illusion!! They all look perfect, when they really, really weren't anywhere close. 


So I bet you're thinking.... Oh so she'll just frost the top and they will be so cute! Right??

Wrong. So wrong. This is Cakerella you're messing with. No way we are only doing one layer of filling.


You halvsies them up horizontally....


....and spread some filling in the MIDDLE first.


Then replace the top and spread a little more over the cap.


A simple, beautiful twist on a classic.


These were not time consuming at all. Very few ingredients, very easy. In fact the thing that took the most time was buttering and flouring the pans!...... (No, I don't want to talk about that.) I would just use cupcake papers... but it seems a waste if I'm taking them off right away.


I have been wondering about those silicone baking cups..... although I've heard it's hard to remove the cupcake afterward. But I guess it can't be harder than having to run a knife around ever single one. And I wouldn't even have to grease them!... Perhaps something to consider.

Anyway. The cupcakes were delicious, the party was so much fun! Thanks to my mom, Aunt Gail, Grandma, Melissa, and Laura for making it such a great time. I hope we do it again soon!.... Only downside... I woke up this morning and felt like I got hit by a bus. A salt bus. You ladies all know what I'm talking about. Happy Baking, Here's the recipe:

Martha Stewart's German Chocolate Cupcakes

Makes 24 cupcakes 


3/4 cup (1 1/2 sticks) unsalted butter, room temperature, plus more for tins
2 cups cake flour (not self-rising), sifted, plus more for tins
1 teaspoon baking soda
3/4 teaspoon salt
1 1/3 cups sugar
3 large eggs, room temperature
1 1/2 teaspoons pure vanilla extract
1 cup buttermilk
5 ounces semisweet chocolate, melted and cooled   

Directions
1. Preheat oven to 350 degrees. Brush standard muffin tins with butter; dust with cake flour, tapping out excess. Whisk together cake flour, baking soda, and salt.
2. With an electric mixer on medium-high speed, cream butter and sugar until pale and fluffy. Add eggs, one at a time, beating until each is incorporated, scraping down sides of bowl as needed. Beat in vanilla. Reduce speed to low. Add flour mixture in three batches, alternating with two additions of buttermilk, and beating until combined after each. Beat in chocolate until combined.
3. Divide batter evenly among prepared cups, filling each three-quarters full. Bake, rotating tins halfway through, until a cake tester inserted in centers comes out clean, 20 minutes. Transfer tins to wire racks to cool 10 minutes. Run a small offset spatula or knife around the edges to loosen; turn out cupcakes onto racks and let cool completely. Cupcakes can be stored up to 3 days at room temperature in airtight containers.
4. To finish, use a serrated knife (and a gentle sawing motion) to split cupcakes in half horizontally. Spread a heaping tablespoon of frosting on top of each bottom half; replace top halves. Spread more frosting on top of each cupcake. Serve immediately.
Makes enough for one 9-inch 3-layer cake.... (or a batch of cupcakes)
3 large egg yolks
1 can (12 ounces) evaporated milk
1 1/4 cups packed light-brown sugar
1 1/2 sticks (12 tablespoons) unsalted butter, cut into small pieces and brought to room temperature
1 teaspoon pure vanilla extract
1/4 teaspoon salt
2 2/3 cups (7 ounces) sweetened flaked coconut
1 1/2 cups (6 ounces) pecans, toasted and coarsely chopped

Directions
1. Combine egg yolks, evaporated milk, and brown sugar in a saucepan. Add butter, and cook over medium heat, stirring constantly, until thick, about 10 minutes. Pour through a fine sieve into a bowl.
2. Stir in vanilla, salt, coconut, and pecans. Let cool completely. Frosting can be refrigerated in an airtight container for up to 1 day; bring to room temperature before using.

Sunday, October 10, 2010

HEY! I saw this really cool idea using bundt pans....

As promised, I devoted my entire Saturday to creating something truly special for this weekend. It was real live Canadian Thanksgiving!!! Woohoo!!

Throughout the day, and the past few weeks, I was thinking about things I was particularly grateful for. For one, I have found a newfound appreciation and thankfulness for the wonderful people that make up my family. I know, I know, EVERYONE says this.. it's like the automatic go-to when put on the spot. But I took a hard look in the last couple of days and I've really come to know how much they mean to me. 

Anyways. I'm also thankful for.... you guessed it. Butter. LOTS of butter. And pumpkins. To make pumpkin puree for......  THE GREAT PUMPKIN SPICE MARBLE CAKE. Blah. That's a mouthful. It's sort of a hybrid of two recipes for pumpkin shaped cakes. Now. Firstly... When I discovered this cake I thought... OH HOW SMART. They just stacked two bundt pans on top of each other and presto chango... a pumpkin. Easy freaking sauce. 

..... How naiive I was. 

Yeah so it's actually a pumpkin MOLD... a ten cup pumpkin mold. So. To make TWO bundt pans I was crossing my fingers a double recipe would fill the pans... but not OVERfill the Kitchenaid. Tricksy. 6 cups of flour, 6 cups of sugar, 2 cups of butter, a TON of spices and about 3 cups of pumpkin and 4 cups of milk. That's alotta cups. 
Just the dry ingredients. Oh boy.

Dare you to drink it.


Thankfully it fit. Whew. That would have seriously.... sucked. So then you snatch 3 cups of your monster batter and mix in a bunch of cocoa. 

This is the cocoa.
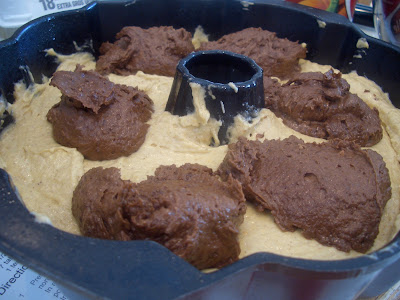
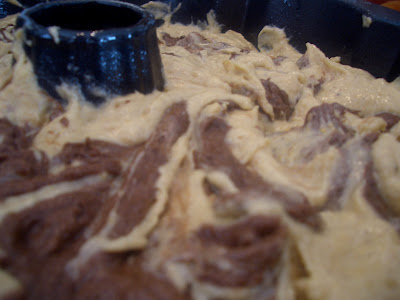
This creates the MARBLING. You the pour in the regular batter, and spoon in the chocolatey pumpkin mix. Then, with a knife, you swirl it around till it looks pretty. 


Add the cocoa'd batter in spoonfuls laik dis.

Just give me a spoon now.
All bakey and wonderful!
Popped out relatively in one piece. SCORE.

The recipe also called for dulce de leche. Read that again... slowly. DULCE. DE. LECHE. Still are unsure about how to say it? Don't you fret. I, being the responsible baker, found a pronunciation guide to assist you (and myself) in the proper way to say it. 

dool- se (as in set without the T)

de (Like dead without the second D)

leche (as if you were in a french restaraunt wanting to say "i need le check" but without the ck)

Dulce de Leche. Aka... caramelized Eagle Brand. Hold me. 

To do this... you need to boil in in water for probably 2 hours... if not more. Protip: keep adding water so the pan doesn't dry out. This would like scorch the metal AND cause a molten lava eagle brand explosion. Not What You Want.
This is what I used as the glue to stick the cakes together. Intense? Yeah. 
It should look something like this when it's done. It's also great on toast.... :)

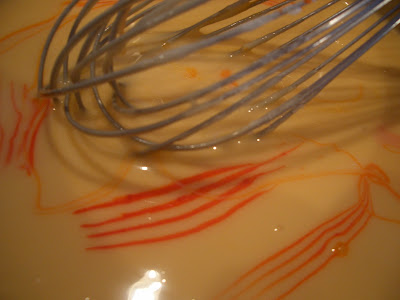
Afterwards.... it was time to glaze the cake. Easy glaze? Powdered sugar, milk, and vanilla. Oh yeah, and a lil something I like to call... gel food coloring. This is really the only way to get intense colors in your food. Liquid does NOT work... especially with reds. The best you will get with liquid will be hot pink. However, I wanted a subtle orange glaze, not a neon syrup. 

All you need to do is to dip a fork into the tub and pull it straight back out. No scooping required. You can get quite vibrant colors with small amounts of the gel. 
So... you know that whole thing how I said I didn't NEED the pumpkin mold?... Yeah never again. Protip: Buy. The. Mold. This was ALOT of trouble. 

Trying to get a poury picture.


Also... the pumpkin mold has a built in stem. Bundt pans have a giant crevasse to fill. What the frick am I going to use to make a stem??... 

Oozy drippy awesomeness.

I ended up with three layers of glaze.

At this point of the night I had been staring at it for much too long and it was hideous at every angle. I took a couple hour break to ponder stemming this stupid piece.
Lowpoint. You can tell because my diet pop is making the picture. At this moment... the cake had been disassembled for further shaving.
Stroke of genius hit, and it was back to work. 


Yep, an ICE CREAM CONE. Ta Da!
Just coat it with some chocolate and voila. 
I added a few flourishes to make it a little more festive.... courtesy of my mom's wreath hanging on our front door. All for a good cause mom, I promise.

Melissa and I did something special this year... WE STUFFED THE TURKEY!! Well, I stuffed the turkey. She rubbed on the dry rub afterwards. This turkey was intense. It was brined overnight and then slowcooked for 6 hours. Seriously guys? Worth the effort. But back to the cake. Enough of this turkey nonsense. 
Complete with makeshift stem.
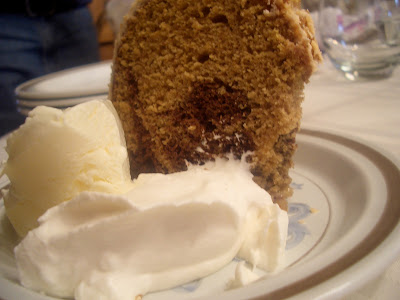
We had the missionaries for Thanksgiving dinner so I was hoping that my newest creation wouldn't be overshadowed. Unfortunately, one of our missionaries was lactose intolerant. Pfft. But the other Elder was impressed to say the least. Melissa ate it... and there was no cream cheese! I'm getting better every time. It was really delicious and put us all in the holiday mood. I love the comforting aroma and taste of pumpkin spice. And the chocolate marbling? Le manifique. I'm not a huge fan of sugar icings... but it was a necessary evil to obtain the presentation I was gunning for. Besides, a helping of Chantilly Cream will do just fine. 

After dinner, me, my sister and my mom took the dogs and my niece on a short walk in the crisp autumn night. It wasn't as cold as I would like, nor was there snow on the ground. But when we stepped out that door something magical happened: I saw the very first set of Christmas lights illuminate a house on our street. It doesn't get much better than that ladies and gents. Happy Thanksgiving!


Tuesday, October 5, 2010

Crunchy or Puffy?...

Puffy? Wimp.

So. Scenario. Surprise visit from my dear brother Lee. Lee wants a turkey. And a birthday celebration. Lee it's just not possible. It's just not feasible... it's just not... just not... jus..... AUGH FINE!! But only cause I'm nice.

So the first day (which this entry is not about) I slaved for hours making THE CAKE. I figured it was the best recipe thusfar and was fitting for my dearest elder brother. I went to Safeway three separate times that day... and it's not like I'm just another random in the grocery store.... My hair is flaming red. I'm pretty easy to pick out of a crowd. It's like Where's Waldo for the innocent bystanders. I went in the morning for dark brown sugar, corn syrup, icing sugar and cream cheese.... then in the afternoon for whipping cream and finally that evening for turkey and all the fixings. The cake, somehow, was a disaster. I ended up having to skewer it together AFTER turning it upside down. Plus the bottom layer got a bit crushed. I'm not sure how that happened. However, I did nail toasting the pecans this time and the pecan coat was very even and the cake was not lopsided. I'm getting there, slowly but surely. I really, REALLY need 8'' cake pans.

Day two was Turkey Day. We bought a fresh turkey because we were going to bake it the very next day, and my thoughtful little brother (just trying to help) threw the turkey in the freezer. I can only imagine the horror the person who discovered it must have felt. Cold shiver down their spine and all that. So they baked it for a good 3 hours by itself to thaw it. Then it was stuffed with a ton of thyme and parsley and was roasted till din din.

But this isn't about Turkey or CAKE or Safeway. This particular entry revolves around CREAM PUFFS. Ahh cream puffs. One of the more delightful pastries. Like sweet Yorkshire puddings that you stuff according to your whim of the moment. Would you like custard and whipped cream? Or perhaps chocolate and ice cream? Or if you are like me... a smattering of everything? Yes.... yes.
                 
Butter. Did you expect anything else from Cakerella? Really??

Cream puffs have very few ingredients... but the main thing with them is you have to watch them very carefully. Like unto a hawk. This was made difficult by my crappy oven's lack of functioning light bulb. So, consequentially, you could oft find me crouched down beside it cupping my hands around my eyes to try and see inside.
This is where it starts to get hard to stir...


The first go at the cream puffs wasn't the smoothest. Stirring in one egg at a time is not easy on your arm.... and it felt like alot of guesswork. Especially when shaping the puffs and coating them with egg wash. I had a very hard time with the concept of baking them at 415 convection for 15 minutes... then for another 15 at 365 convection. 30 minutes of bake time?... for PASTRY?? It didn't seem right. And it most definitely wasn't. What a disaster.

You know that oath on my homepage? If you don't, go take a look. I would like to make note that part of that oath inspired me at this dire moment. All hope was lost. I was tired, frustrated, starving, and had too few cream puffs that were overcooked. But, as Cakerella, I vowed to fix it if it wasn't right. So I busted out the butter and put on my game face.


I reduced the overall cooking time by around 9 minutes, taking time from the first and third baking cycles. I camped by the stove the entire time. Right as soon as I saw them becoming that wonderful shade of gold, out they came.


They were absolutely beautiful. That is a CREAM - PUFF ladies and gents.

I served them with creme patisserie, chantilly cream, ice cream, and melted Callebaut chocolate. I found that the build your own dessert idea was a charming way to bring us a little closer at the close of the meal.


They were a lovely little treat at the end of the best Thanksgiving Dinner I have ever had. It just goes to show you what you can pull off when it is required of you... not that this was the first time we have made this evident.


We were planning on making a HAM this week. But the need arose and we all banded together to make it happen. The food was delicious, the company was delightful, and the spirit in our home was truly beautiful.


Something's missing....
Oh yes. Chantilly Cream and Diet Pepsi.

And how amazing it is that I am lucky enough to run this blog. If I want to run to the store and pick up a bunch of baking supplies I can. If we want to go and buy the biggest turkey in the store for an impromptu Thanksgiving, we can. If we want to spend time with our families who live far away we have the means to do so. We are blessed with SO much and many of us (including in large part myself) don't even realize it. This weekend I was so grateful for the incredible family I have been blessed with. What in the world would I do without you? I love you all immeasurably and am so privileged to know you.


As a side note.... I'm not exactly sure how Turkey Dinner Dessert evolved (or devolved) from lattice and pumpkin pie to cream puffs, but that is how it played out this year. However, this was just Turkey Day uno. We are having part two next week, and I have a special concoction in the works for yall then. Happy Baking!